Journal
Natural Dyeing with Hawthorn: Four Colours from One Tree
Hawthorn has been part of British life for at least 6,000 years. The pollen shows up in the record from that far back. It’s in the folk medicine, the May Day celebrations, the hedgerows, the fairy tales. One of those plants that human beings have simply always been alongside.
It’s also one of the best dye plants you’re likely to find in your garden or local hedgerow, and it gives you more than you might expect from a single shrub.
In this video I’m working with hawthorn I’ve cut from a self-seeded shrub in my own garden. By keeping the leaves and the bark from the twigs separate, and then modifying one skin from each bath with iron, I end up with four quite different colours.
Why Hawthorn Works as a Dye Plant
The leaves and the inner bark give very different results. The leaves produce yellows — a soft, mid golden yellow. The inner bark (the layer between the outer bark and the white interior wood) gives a warmer, more orange-caramel tone.
If you’re gathering from a hedge or tree rather than a garden shrub, you’d ideally strip just the inner bark from larger branches. On small thorny twigs it’s more practical to chop the twigs into pieces and work with what you can.
A word about the thorns: the leaf-bearing branches tend to sit around the spines rather than between them. You can strip leaves off by holding the main stem and drawing your hand along it. It works well and saves a lot of fiddling.
What You’ll Need
- Hawthorn leaves (fresh, not tough old ones; end-of-spring leaves work fine)
- Hawthorn twigs with inner bark (small twigs chopped, larger ones stripped)
- Pre-mordanted wool (I’m using alum-mordanted sock wool)
- Washing soda (sodium carbonate), about half a teaspoon per pan
- Ferrous sulphate, about half a teaspoon for the iron modifier bath
- pH strips
- White vinegar
- Two dye pans, one modifier bowl
Step 1: Prepare the Leaves
Strip the leaves from their stems and put them straight into your pan. Cover with just-boiled water, add a small amount of washing soda (roughly half a teaspoon), and bring to a simmer.
The washing soda makes the bath alkaline. This matters because simmering plant matter naturally acidifies the water, so you’re just counteracting that a little. It also seems to help bring out yellow tones.
Simmer for around 20 minutes, then let it cool. Reheat, cool again, and if you can leave it to steep overnight you’ll get a richer colour.
Step 2: Prepare the Bark
Separate your twigs from any leaves, leaves going into the leaf pan, twigs into their own pile. On larger pieces, try to scrape off the outer bark so you’re left with just the inner layer. On smaller twigs, chop them into pieces; there’s no need to be precise.
Add washing soda (a full teaspoon this time, as the cell structure of bark needs more help), cover with boiling water, and you’ll likely see colour coming out almost immediately.
Leave this one for at least 24 hours before straining.
Step 3: Strain and Check pH
Strain both baths and discard the plant material. The leaf bath will be a warm golden colour. The bark bath should be a rich orange-brown.
Check the pH of both. After steeping, the bark bath in particular is likely to be quite alkaline, around 10. Add white vinegar, a little at a time, until it comes back to neutral or just slightly acidic. Don’t do this while the liquid is hot.
Step 4: Dye the Wool
I’m using pre-mordanted sock wool, two skeins per bath.
For the leaf bath: soak your wool, squeeze it out well, and lower it into the warm dye bath. Bring the temperature up to a comfortable hand-hot (not simmering, definitely not boiling) and hold it there for about half an hour. The colour should transfer well at this temperature without risking felting or damage to the fibre.
For the bark bath: the same process. The colour tends to be more concentrated, so you may see a bigger change in the dye bath as the wool takes it up.
Leave one skein from each bath undipped in iron. These are your base colours.
Step 5: Modify with Iron (Saddening)
The process of using iron to shift a colour is called saddening. It darkens and dulls the original colour, which sounds less appealing than it is. The results are often the most interesting of the four.
Dissolve about half a teaspoon of ferrous sulphate in a bowl of water. The granules are mint green and dissolve quickly.
Take one skein from the leaf bath, squeeze it well, and lower it into the iron bath. The colour shifts almost immediately toward green-grey. Keep an eye on it; it doesn’t take long. Once you’re happy with the colour, move it to a rinse bowl.
Do the same with the skein from the bark bath. This one moves toward a warmer, darker brown.
One note: keep your iron solution well away from your undipped skeins. Iron spots are very hard to remove, and a splash can leave permanent marks. Use a separate stirring stick for the iron bath.
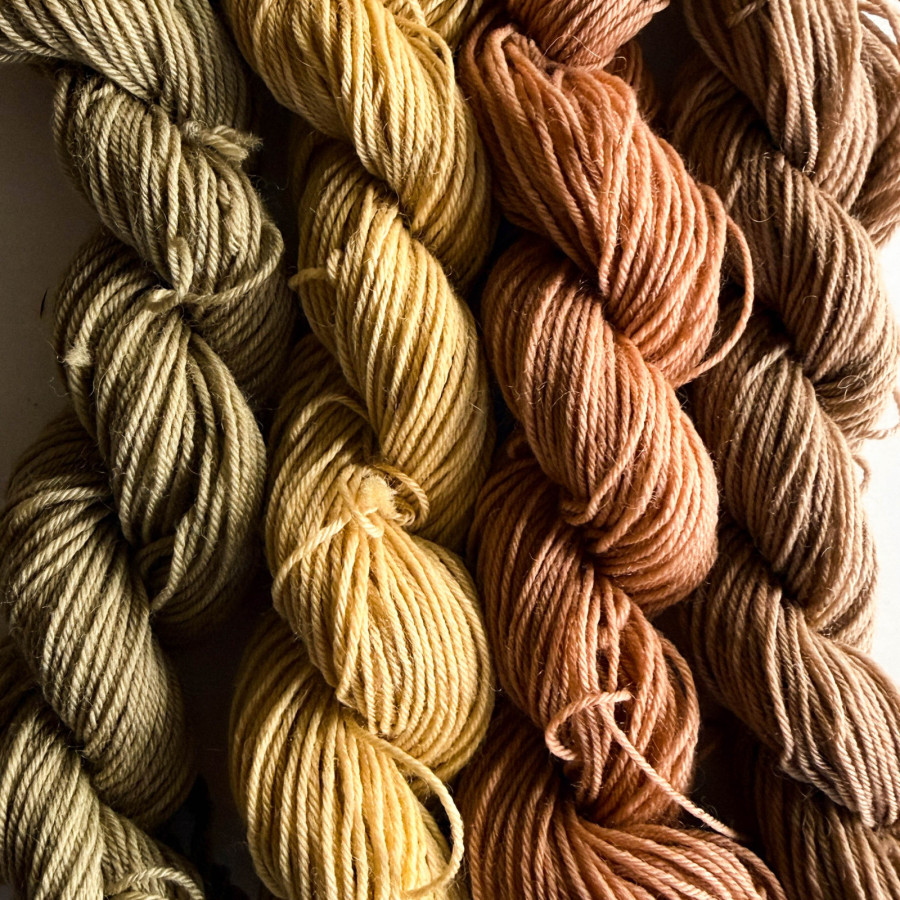
The Four Colours
From this one plant:
- Leaf, no modifier: soft golden yellow
- Leaf, iron modifier: green-grey
- Bark, no modifier: caramel orange-brown
- Bark, iron modifier: warm mid-brown
Plant dyes are always subtle. You can push the iron further and get darker results, but the more iron you use, the more you risk degrading the fibre over time. A little goes a long way.
A Note on Hawthorn
I dye with native plants whenever I can, but hawthorn is one I particularly like working with. Something about the depth of its relationship with people here, 6,000 years of entangled life, medicine, superstition, celebration, means that wearing something dyed with it feels like wearing something of this place.
The skeins I’ve dyed here are going into a pair of striped socks, alongside nettle-dyed wool from an earlier session. I’ll show you those when they’re finished.
Here is a download with all the instructions
You may also enjoy …
They Called It Matrons Wear: What 1950s Knitting Patterns Told Women to Be
I needed a summer cardigan and ended up in a 1950s book called Matrons Wear. What I found in there was interesting, and not just the patterns. Free download included.
2 months ago
Mindful sewing project - Patchwork Christmas stocking pattern
Patchwork Christmas stocking pattern
3 years ago
Dyeing wool with dahlia flowers
dyeing wool yarn with dahlia flowers, flowers for natural dyeing
3 years ago
Studio Exclusive: Dyeing with Hollyhock, true blues
Discover how black hollyhock flowers create stunning natural blue dyes - a simple alternative to indigo that works beautifully for small-scale projects. Easy growing and dyeing tips included.
10 months ago
