Journal
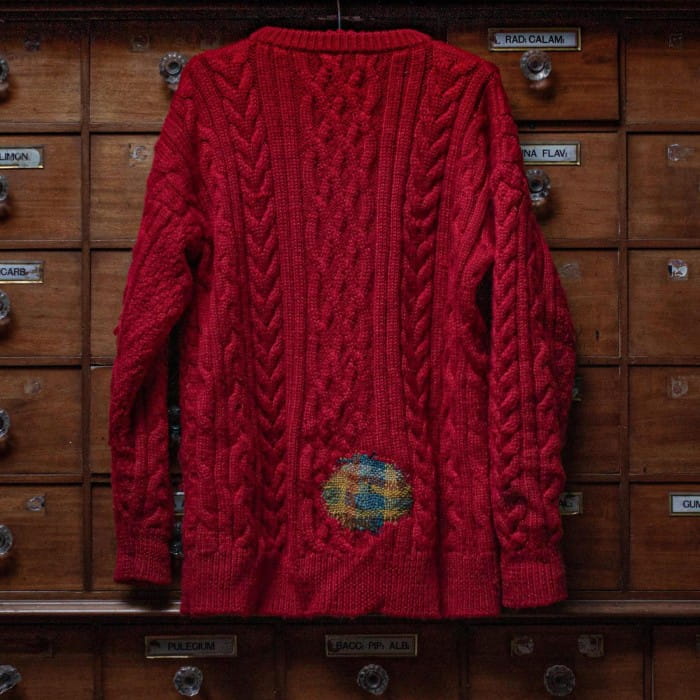
Visible mending on a knitted jumper
Mending baskets! Is there anything quite as likely to engender feelings of guilt as we pass.
All those almost wearable clothes just needing a little attention.
A few years ago I was given this cosy Aran jumper as a Christmas present.
Four times worn and I backed into a barbed wire fence; by the time I had disentangled myself there was a massive hole on the backside.
The wool itself had shredded - much of it left on the fence and I put the jumper in my mending basket to repair. . . .

Four years later, clearing out the 'dressing room of doom' I determined to do better.
It was a drizzly day, I had nothing else pressing to do, I got out some scraps of left over wool and a tapestry needle. It took less then an hour.
Four years and an hour.
In case you also have a ripped jumper in need of some creative mending, here is what I did.
The mending of the ripped aran jumper.
As the rip is very firmly on my backside I decided that it needed a curvy darning, but otherwise I followed the instructions of Flora Collingwood Norris here. The cabling meant that this was never going to be a neat and regimented darn - and it is a little bit more like a hobbity mend, but I love it's organic shape.
Materials
- Holey jumper
- Tapestry needle
- Selection of yarns of similar weight to the jumper
- Scissors
Step 1
I cut out some paper shapes to see what size and shape the patch should be. I went with a circle.

Step 2
Use a contrasting yarn to sew a tacked outline. This is just there as a guide and it will be removed later.

STEP 3
Begin to work up and down over the hole. These are the warp threads of the woven patch. Make a little reinforcing stitch at either end of your warps, a little back stitch outside the circle. This makes the patch stronger and also is a bit of decoration. The stitches should be even - try to keep them half a knitted stitch apart. Pay attention to the tension of your warp - it shouldn't be too loopy, but it shouldn't be too tight either or the patch will pucker.

Continue working the warp - here you can see the different stripes of colour that I chose.

STEP 4
Now begin weaving the weft - start at one side, make a little reinforcing stitch and then go over and under and over and under the threads till you reach the other side. Make a stitch and go back the way you came with another row - this time make sure you go over all the threads you went under last time and under all the threads you went over. the first few rows are the trickiest but then you will get into a rhythm.

Every few rows stop and squash the rows down so that they form a fabric. You want the patch to be similar in feel to the jumper - so if it is a fine jumper they should be neatly squashed together, if it is a heavy weight and cabled super like this they can have a more energetic and organic feel.
STEP 5
Finish the back by making sure all the ends of yarn are well secured and cut them short.
Remove the tacking stitches.
Gently steam flat with an iron not quite touching the surface of the patch - this will take out any puckering.

STEP 6
Pat yourself on the back and wear your creative mending proudly.
You may also enjoy …
Five ways to step back from overwhelm
5 ways to get over overwhelm
6 years ago
Collecting acorns at Loch Lomond
a walk to Loch Lomond to collect acorns for natural dyeing
3 years ago
The joy of a sitooterie
Making an outdoor space for working during the winter sitooterie
3 years ago
My Simplicity Experiment Month One
Tackling my dependence on my phone and regaining focus
1 year ago
