Journal
All postsMaking & CraftGardening & NatureArt & CultureSlow LivingPeople & PlacesFood & DrinkStudio Club
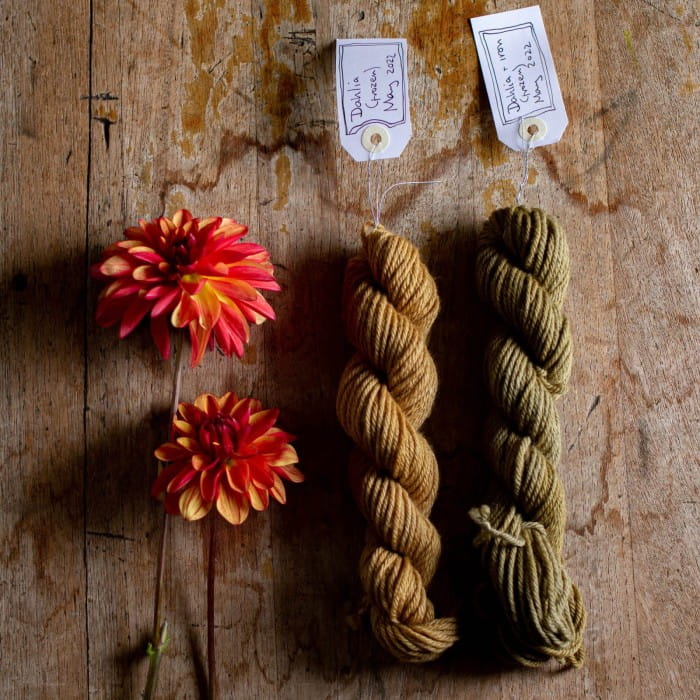
Dyeing wool with dahlia flowers
Dahlias are the star of the early autumn garden – those great flower heads glowing in low sunlight, the different shapes and colours making everything just a little jollier.
You need
- 100g wool
Mordant – 10g alum - Dye material
Non cooking pan/sieve/tongs (pick these up from a charity shop or car boot sale and keep exclusively for dyeing – if you want to dye using your normal kitchen equipment see the note at the end)
Method
Step 1. Collect your dahlia flowers. Any dahlia flowers work for dyeing apart from white or pale pink varieties Massive dinnerplate dahlias, with their millions of petals are perfect as there is so much in each one, but the smaller anenome flowered and single ones work just as well, you will simply need to collect more of them.
Step 2. Store your flowers – you might want to build up your collection of flowers t o make a single big pot of dye. You can either dehydrate all the flowers and store in paper bags or you can freeze them. I find that using twice the weight of flowers as you have wool works well. Try to get at least 200g petals together before you begin.
Step 3. Prepare your wool by washing it well and then rinsing.
Step 4. Mordant your wool. Use aluminium sulphate mordant to prepare your wool so that the dye will stick to the wool fibres. You need 10% the weight of your dry wool in mordant – so for a 100g skein of wool you need 10g mordant. Dissolve the mordant in a small amount of boiling water and then add to a bowl or tub of luke warm water, stir and add the socks. Leave to soak for 24 hours.
Step 5. Make the dye pot. Simmer your dahlia flowers i n water for 40 minutes and leave to steep overnight. Heat up again for 20 minutes and leave to cool before straining. You want there to be enough pigment in the water that you cannot see a spoon under the water. If it is too pale add in more flowers to the pot and bring to a simmer again.
Step 6. Once cool, add the wet wool to the dye pot. Make sure there is enough water to cover it and add more if you need to. Adding water doesn’t make the dye weaker – the colour is dependent on the actual amount of pigment in the water, no t the concentration.
- Step 7. Gradually heat up the dye pot - you don't want to over heat the water and accidentally felt your wool - if you get it to a temperature where you can put your hand in, but only just, that is perfect!
- Step 8. Hold that temperature in the pan for 40 minutes and then let it cool naturally. If you would like a darker colour (and remember it will dry much paler) then leave the wool to steep in the dye pot overnight.
- Step 9. Rinse the wool in plain water until the water runs clear and leave to dry naturally.
- Step 10. If you want to change the colour of your yarn to an olive colour add 1 teaspoon ferrous sulphate to a bowl of water and stir to dissolve. Add the yarn and watch for the colour change. Rinse well immediately. Do not leave any iron on the yarn as it can damage the fibres.
- Step 11. When the wool is completely dry, put it somewhere dark to cure for a couple of weeks, this lets the dye settle into the fibres really well so it won't wash out.
- Step 12. Wash with an eco detergent and leave to dry naturally.
You can get a downloadable PDF of this tutorial by signing up to the Natural Dye library.

You may also enjoy …
Getting back to making clothes
starting to making your own clothes, freehand machine embroidery
4 years ago
Natural Dyeing with Hawthorn: Four Colours from One Tree
Natural dyeing with hawthorn leaves and bark, a step-by-step guide to getting four colours from one plant, including iron modification. Shot in Scotland.
1 month ago
1930s Triangle scarf
I spent an hour on Ravelry. Ten minutes in my pattern stash found exactly what I needed; a 1930s P&B Wools triangle scarf. Free pattern download included.
6 days ago
Making an honesty garland
how to make foraged decoration honesty garland decorate party
4 years ago
Comments: 0 (Add)
You must be signed in to post a comment. If you're already a member, please sign in now. If not, you can create an account here.
