Journal
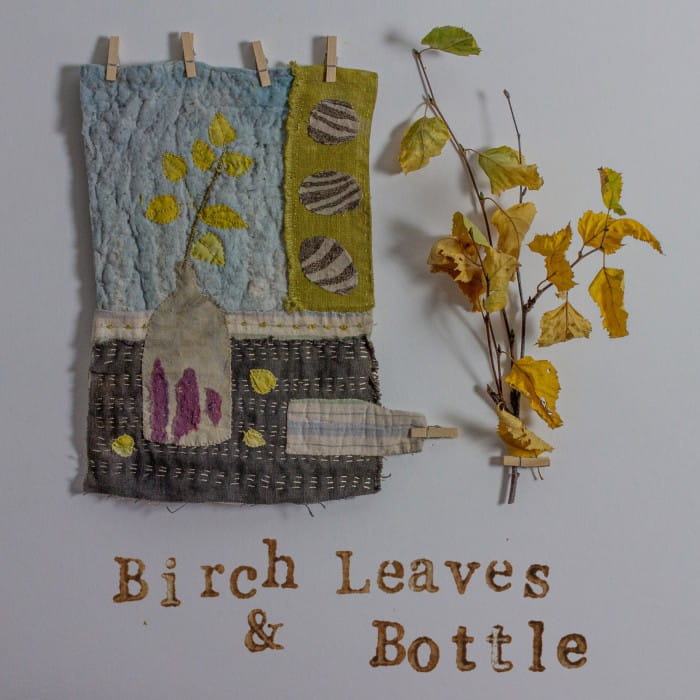
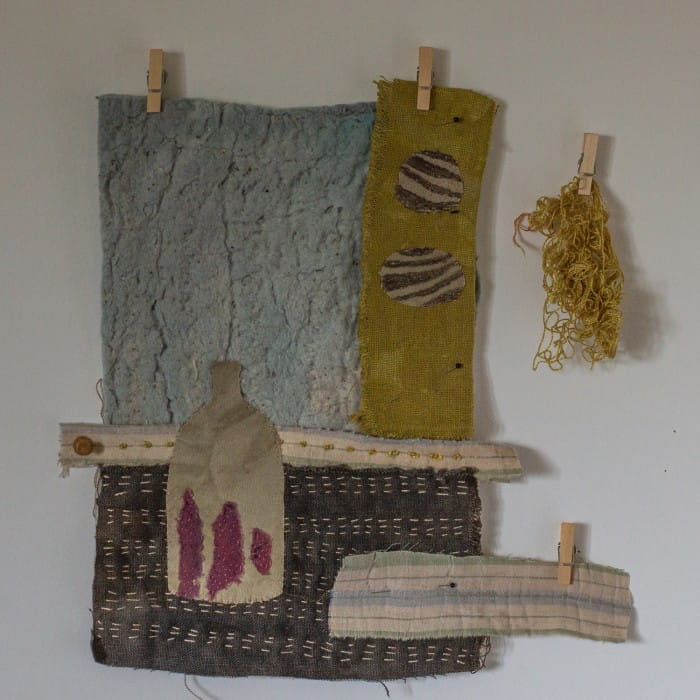
"Birch leaves in a bottle" embroidery part two
I finished the first of the embroideries that will eventually go onto the wall behind the kitchen table and it is now packed away in paper waiting for its eight companions.
I find that my creativity responds well to limits, to working within set edges. The edges for this project are mainly to do with materials - a mix of the pieces salvaged from the original tattered wool quilt and pieces of fabric dyed with plants from the garden here. There is also the possibility of adding in plant material - like the stem here - and maybe some bits and pieces like buttons I have inherited.
Nothing new though.
Start where you are, use what you have *
There is also a restraint in the size. As this is to be one of eight or nine embroideries to hang in a grid behind my kitchen table, though they don't have to be alike, they do need to fit into the same size frame.
The size of each piece of backing fabric is A4 (21 x 29 cm).
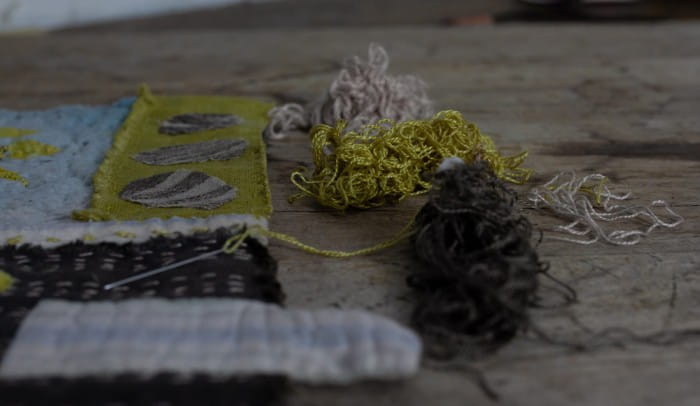
The fabrics are a striped flannel which was the backing of the quilt, wool pieces in various states of decrepitude which were the patchwork, a wool batting that was the padding for the quilt which is beautifully stained blue by the colour running at some point. Then I have a selection of linens and threads dyed with plants from the garden here - in the photo you can see threads dyed with birch, sweet cicely and alder cones.
"Birch leaves in a bottle" embroidery part one
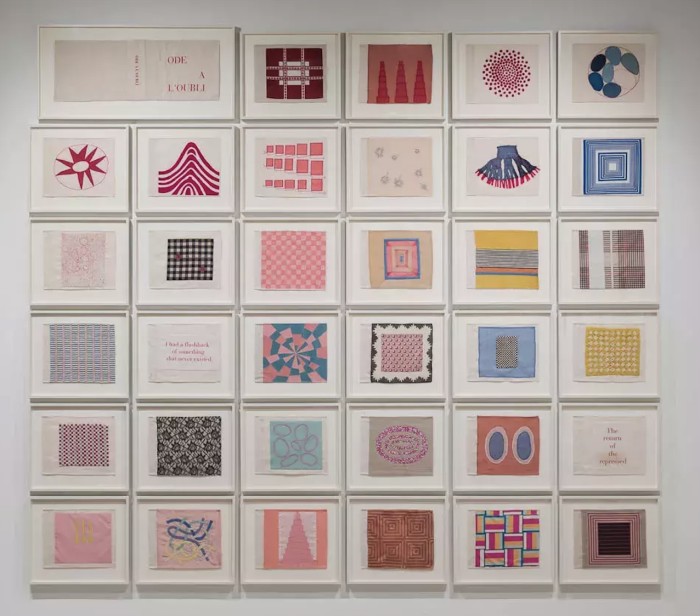
Earlier this year I went to the Louise Bourgeois exhibition at the Hayward Gallery with my friend Rebecca . It was an amazing exhibition, one of those exhibitions that change the way you think and I came away with my head buzzing.
Buzzing loudest was the desire to embroider a set of pictures and hang them as a grid to fill a wall.
This is inspired totally by the amazing Ode a l'Oubli (Ode to Forgetting), a fabric book of appliqués and embroideries which Bourgeois made in 2004 from fabrics that she had either worn or been carrying about in her stash for decades.
In the Hayward, the 35 pages were deconstructed, unbuttoned from their book form, mounted floating gently in white frames and hung floor to ceiling.
And so the idea was planted and I have been prowling around the house for a blank wall. We live in a 1980s bungalow so there are no exhibition like soaring spaces, but the wall behind the kitchen table is currently blank. Perfect for eight or nine white frames hung in a grid.
Mindful sewing project - Patchwork Christmas stocking pattern
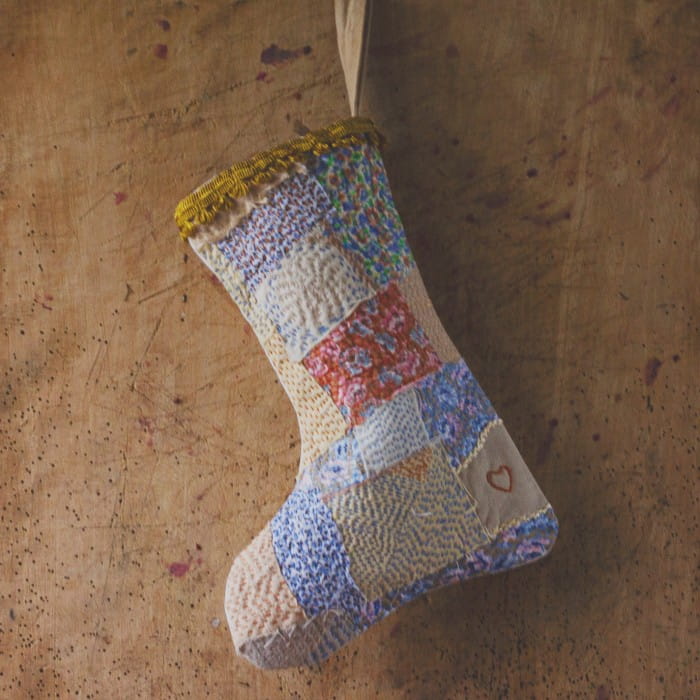
A few years ago I used to put together seasonal subscription craft boxes. They were slightly quirky, full of vintage supplies and things that you couldn't really get in the shops. I loved designing them, searching out the bits and pieces and putting them together.
But the actual packing up the kits involved long, long hours and doing it on my own took a whole week.
Then hefty increases in postal prices eventually made them uneconomic to produce . . . .
One woman made one for each of her grandchildren from old treasured clothes - and that idea of them becoming cherished heirlooms, brought out each Christmas . . . well it made me well up a little. Someone else made crazy patchwork Christmas stockings for her dogs.
Visible mending on a knitted jumper
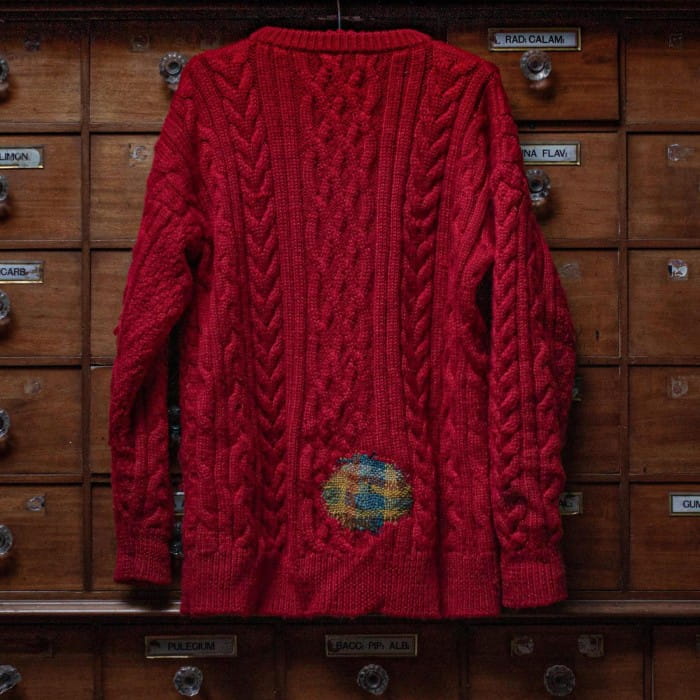
Mending baskets! Is there anything quite as likely to engender feelings of guilt as we pass.
All those almost wearable clothes just needing a little attention.
A few years ago I was given this cosy Aran jumper as a Christmas present.
Four times worn and I backed into a barbed wire fence; by the time I had disentangled myself there was a massive hole on the backside.
The wool itself had shredded - much of it left on the fence and I put the jumper in my mending basket to repair. . . .

Four years later, clearing out the 'dressing room of doom' I determined to do better.
It was a drizzly day, I had nothing else pressing to do, I got out some scraps of left over wool and a tapestry needle. It took less then an hour.
Four years and an hour.
In case you also have a ripped jumper in need of some creative mending, here is what I did.
The mending of the ripped aran jumper.
As the rip is very firmly on my backside I decided that it needed a curvy darning, but otherwise I followed the instructions of Flora Collingwood Norris here. The cabling meant that this was never going to be a neat and regimented darn - and it is a little bit more like a hobbity mend, but I love it's organic shape.
Materials
- Holey jumper
- Tapestry needle
- Selection of yarns of similar weight to the jumper
- Scissors
Step 1
I cut out some paper shapes to see what size and shape the patch should be. I went with a circle.

Step 2
Use a contrasting yarn to sew a tacked outline. This is just there as a guide and it will be removed later.

