Journal
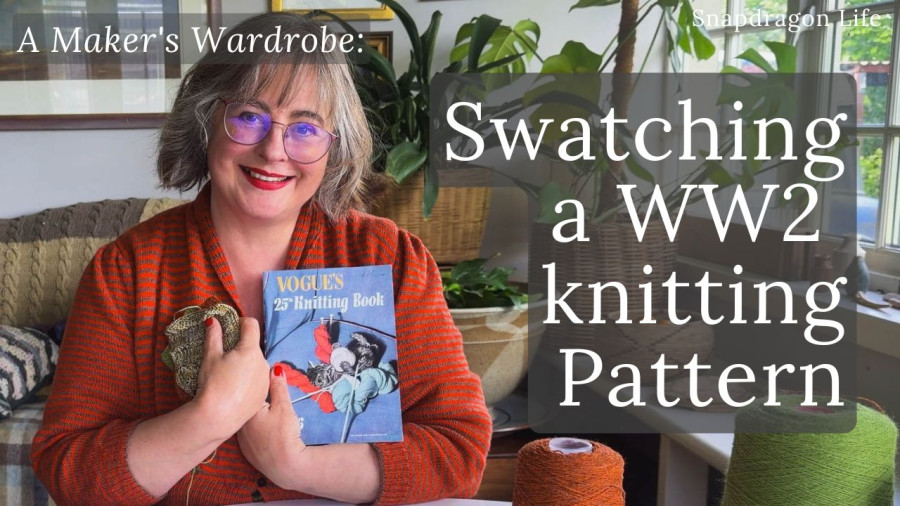
A Maker’s Wardrobe: Swatching a WW2 Knitting Pattern
My mum’s craft room used to be full of my unfinished projects. Recently she got frustrated trying to clear it and started making things into cushions, bags, and pin cushions, giving them away to people. She handed one back to me at Christmas: a moth jumper from Susan Duckworth’s book, which I had clearly got halfway up the back and abandoned sometime in the 1980s. It is now a cushion. A rather nice one.
I don’t think of abandoned projects like that as failures. I think they’re often a symptom of curiosity. A project that got started because something was interesting, and then the interesting thing moved on. That’s fine. The problem comes when the abandoned things pile up and give the inner critic something to work with. The voices that say you never finish anything, you’ve got no staying power, look at all that wasted yarn. Those voices are very good at dimming creativity.
So over the last month I’ve been sorting through the studio. Frogging what can be frogged. Selling unfinished knits on Vinted (surprisingly brisk market for them). Binning the genuinely unsalvageable.
The cardigan that nearly wasn’t
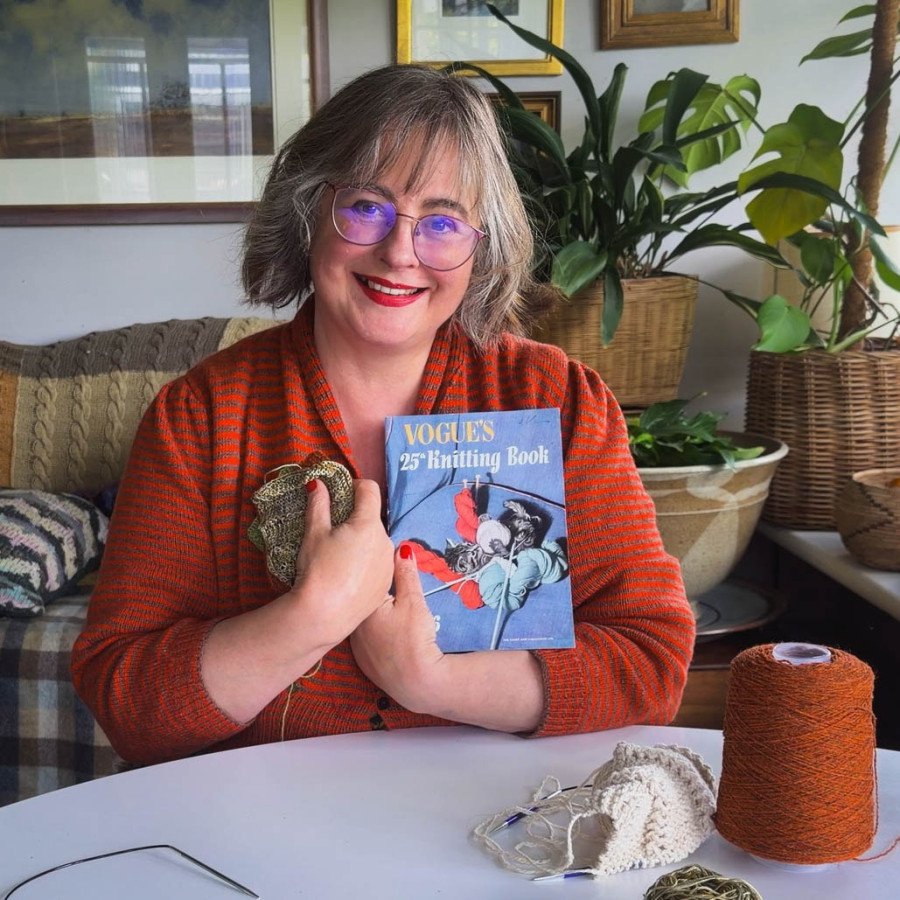
But some of what came back to me wasn’t the hopeless-case category. It was the almost-finished category. Including a cardigan I made when I was sixteen, in colours not unlike the ones I still reach for now, which is essentially complete except for the front rib. That is all that was missing. It fits. It just doesn’t have the rib.
I am, apparently, a person who abandons projects at the final rib.
Also at the second sock past the heel turn. Also at the last twenty rows when my mind has already moved on to the next thing. The project goes into a bag in a cupboard and that’s that.
This is what I am trying to change with this project: not just to knit a cardigan, but to knit it differently than I have knitted before.
The pattern
This is part of my ongoing Maker’s Wardrobe series, and the cardigan I’m making is from Vogue Knitting Book No. 25, a wartime pattern book. I have a whole separate film about this book if you want the full context, but briefly: it’s from the Second World War, it has photographs by Lee Miller, and it was produced under wartime rationing conditions when making what you had last was the whole point.
It’s a single-size pattern. Designed for a 34-inch bust, which is not mine, so I’ll be regrading it. That’s a whole thing for another film.
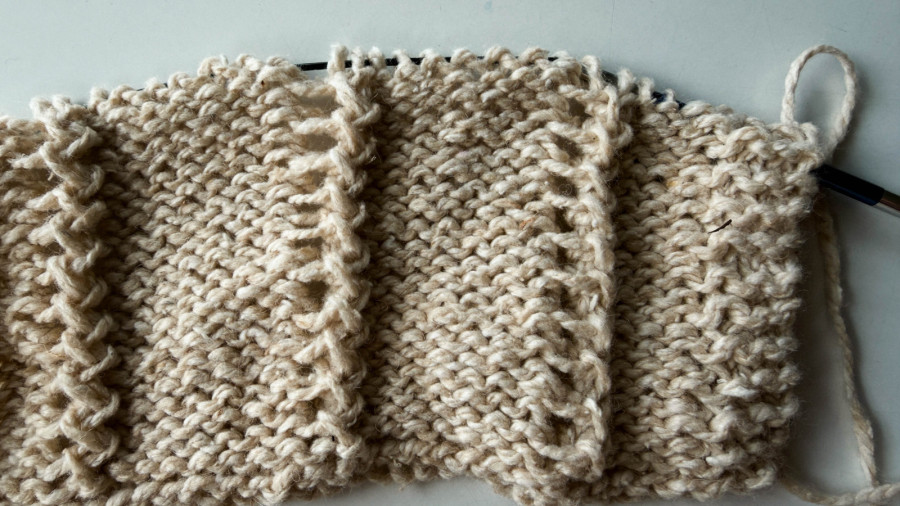
The stitch is a wheat-ear rib, which is beautiful and quite architectural.
Why I had to swatch (properly)
I have not historically been a reliable swatcher. Often the jumper has been the swatch. I’d knit a couple of rows, vaguely check it wasn’t going to be enormous, and cast on.
With this project, I had no choice. Because I need to regrade the pattern anyway, I need accurate measurements. And because the yarn is no longer available (but then, it’s a wartime pattern: you used what you had), I needed to work out what I was actually using.
I had four candidates:
- A lambswool and angora from John Arbon: beautiful fabric, too soft for the rib to show
- Dead stock cashmere from Todd and Duncan, Kinross: lovely, but slightly fuzzy, rib too flat
- Lambswool from Todd and Duncan, slightly heathery and marled: good rib definition, proper tweedy quality
- My own plant-dyed cotton, bundle-dyed with kitchen waste: much higher relief, very clear stitch, no fuzz at all
The swatches taught me things I couldn’t have found out any other way. Not just the fabric quality, which you can’t really assess from a ball, but the drape, the feel against the dresses I’m planning to wear this with, and the actual experience of knitting the stitch. The wheat-ear rib is not quite what I was expecting. Swatching gave me a chance to find that out before I was forty rows into a back.
I am now a reformed person on the subject of swatching. Reluctantly, but genuinely.
I’d love to know which yarn you think I should use. I’m torn between the marled lambswool and the plant-dyed cotton. Both have good arguments for them and I’ll explain those properly in the comments if you want to share your view.
What also came off the needles
Before I could start swatching in earnest for this project, I had a rule: finish what was on the needles first. In the previous film I said I wouldn’t cast on anything new until my Lavenda cardigan was complete.
It is complete. It even has the buttons sewn on. It’s in the thumbnail!
The pattern is here in its original form.
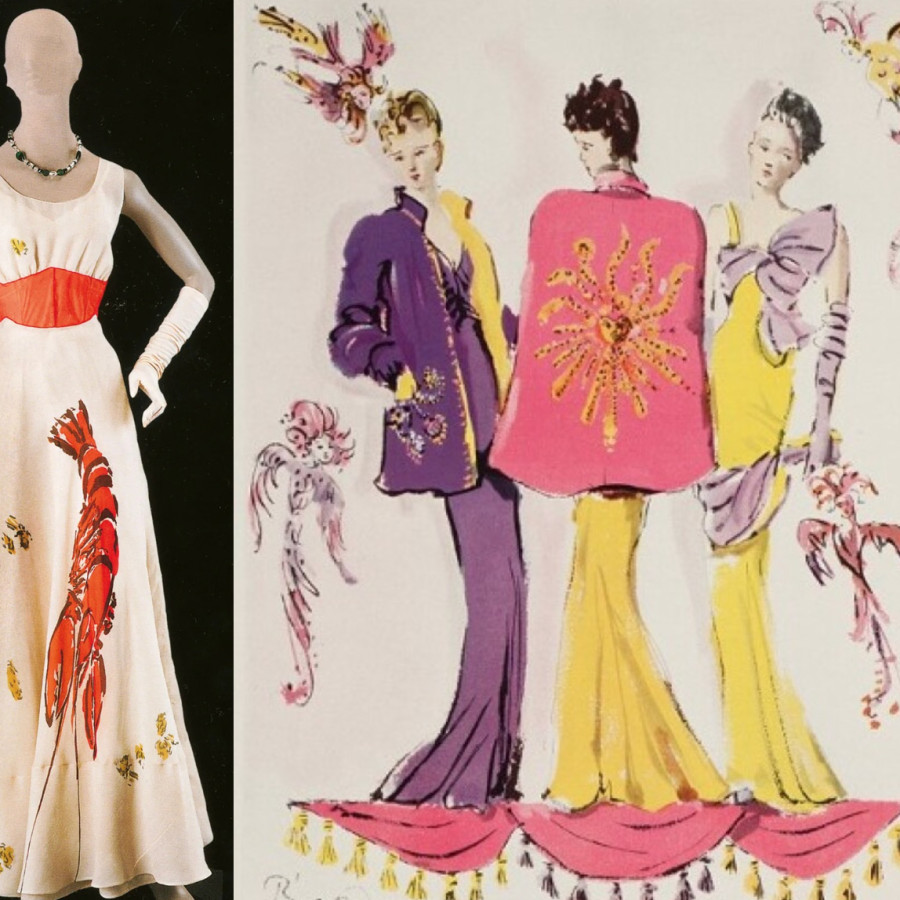
Elsa Schiaparelli at the V&A: The 1930s Couture Collection
Part two of my tour of the Schiaparelli exhibition at the V&A, London. On until 8 November 2026.
In part one I looked at Schiaparelli’s early career and the knitwear designs that launched her. We left her in 1929 with a new investor, M. Khan, and ambitions to become a proper Parisian fashion house.
The timing was not ideal. October 1929 was the Wall Street Crash.
Surviving the Depression
Many fashion houses didn’t make it through the 1930s. Schiaparelli not only survived but grew, and there were four reasons for that.
She had strong contacts in America and Britain, and when people started buying domestically during the financial crisis, she responded by incorporating American and British products into her designs. She licensed her designs into American department stores, making them accessible at a lower price point to an upper-middle-class market. She began selling ready-made items from her own boutiques: scarves, swimwear, pyjamas, perfume, bags. And she concentrated the public-facing, media-facing part of her couture business on extreme luxury pieces that were impossible to ignore.
The last point is the interesting one. While most of the couture money came from well-made, quietly detailed suits and dresses, what got into the newspapers was something else entirely.
This is a tour of the exhibition.
Knitting from a 1944 Vogue Pattern: What I’m Making Next for My Maker’s Wardrobe
I’m on the sleeves of the current cardigan. Which means, predictably, my brain has completely moved on.
This is a pattern I recognise in myself. The nearer I get to finishing something, the louder the call of the next thing. The risk is always the same: abandon the current project, start something new, find the abandoned one five years later at the bottom of a bag. So this year, with the Maker’s Wardrobe project, I’m trying something different. I’m letting myself plan (swatches, yarn choices, thinking through the problems) but nothing gets cast on until the current cardigan is done.
In this week’s film I take you through the book I’m working from and the pattern I’ve chosen.
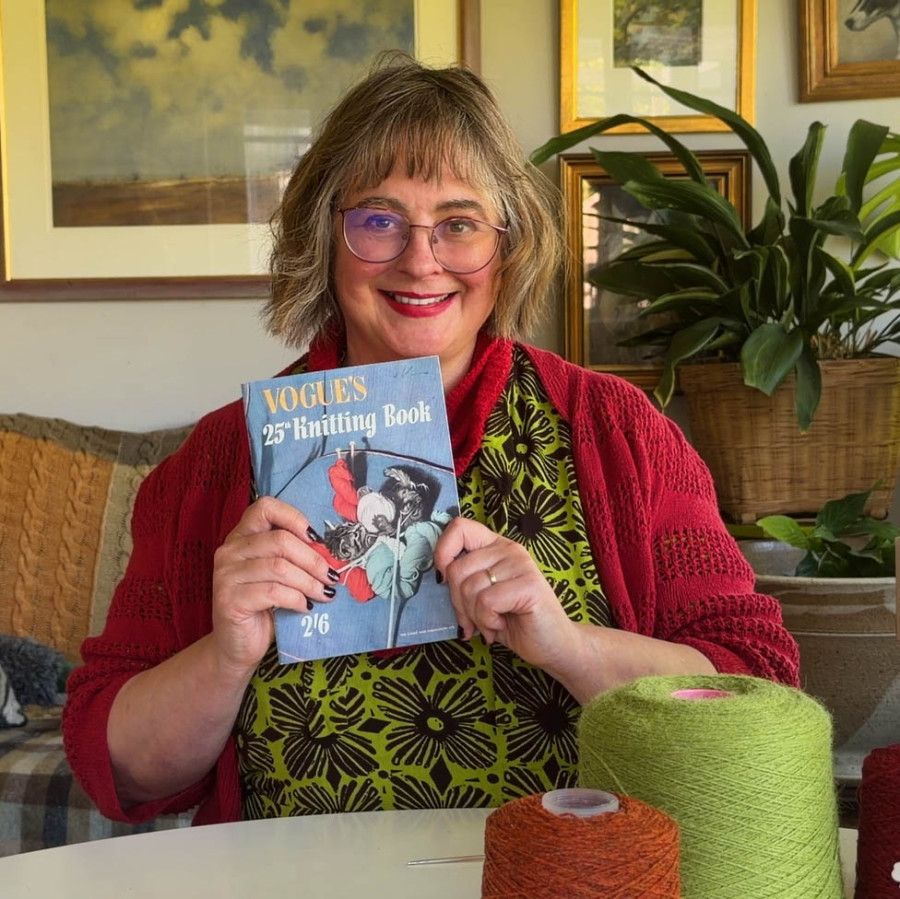
Vogue’s 25th Knitting Book, 1944
I collect vintage Vogue Knitting Books. Most of them (the 1950s and 60s issues) can be found for around £7. But the wartime books are a different matter. Fewer were printed. They were passed hand to hand, worn out, lost. Finding a genuine mid-1940s copy takes patience.
I spent some birthday money on this one. Twenty-three pounds for a single magazine, which felt extravagant until I opened it.
The book is edited under the direction of Audrey Withers, who ran British Vogue throughout the Second World War. Her stated purpose was to keep up the spirit and glamour of British women, to maintain the sense that beauty and fashion were worth protecting even in the middle of everything. The paper was rationed. Many of the photoshoots were taken on bomb sites. By 1944, wool was on coupon (with some exceptions for baby wool and yarn destined for the armed forces), and the knitting magazine reflects this at every turn.
What you get is not just patterns. You get instructions for unravelling old jumpers to reknit the wool. You get designs for knitted fronts (“dickies&rdquo![]() that could be worn under a jacket to give the impression of a new blouse without requiring the coupons for one. You get colour-blocked designs that make a virtue of having two different partial balls of wool rather than enough of one. The whole thing is a lesson in making beauty within constraint.
that could be worn under a jacket to give the impression of a new blouse without requiring the coupons for one. You get colour-blocked designs that make a virtue of having two different partial balls of wool rather than enough of one. The whole thing is a lesson in making beauty within constraint.
The photographs are by Lee Miller, likely some of the last fashion photographs she took before she left for the front as a war correspondent. If you want to understand the world these patterns were made in, the film Lee (2023) is a good place to start. There’s also Dressed for War by Julie Summers, a biography of Audrey Withers, which is excellent.
A digitised copy of the book is held by the Glasgow Women’s Library: Glasgow Women’s Library
The Pattern I’ve Chosen
I’m making the wheat ear rib cardigan. It’s longer than the short cardigans I’ve been knitting. It sits below the waist and the rib stitch stands up in high relief. The neckline buttons high or opens out. There are pockets with a wheat ear edging.
The photograph is by Lee Miller. The model has red nails, a statement bracelet, and a jazzy scarf. It does not look frumpy. That matters, because I have had long cardigans before and something goes wrong and suddenly I am wearing a dressing gown and feeling blue.
I’m cautiously optimistic.
The practical challenges before I cast on are real. The pattern is written for a 34-inch bust, one size only, in a three-ply wool on size nine needles. I’m going to need to regrade it entirely, which means working out the maths from swatches before I start. In the film I talk through how I’m approaching this.
The Yarns
I’m choosing from three wools in my stash, all in autumn colours. The dresses this cardigan needs to go with are greens, bronzes, and dark burgundies. There’s a lambswool with a slight mottled quality, a lambswool-alpaca mix from John Arbon, and a cashmere. I’ll be swatching all three at different needle sizes, looking for the right drape rather than trying to hit the exact tension (since I’m regrading anyway).
Why This Project Matters
There’s something I keep coming back to with this book. These patterns were created under genuine hardship: paper shortages, rationing, bombing. The women making them, the women photographing them, the women knitting from them were living through something difficult. And the response was not to stop caring about beauty or craft. It was to find ways to keep doing it anyway.
I find that worth paying attention to.
The Maker’s Wardrobe project is about building a wardrobe of things I love and will actually wear, slowly, with attention, one considered piece at a time. Knitting from a 1944 pattern feels like the right extension of that.
Why Victorian Needlepoint self destructs
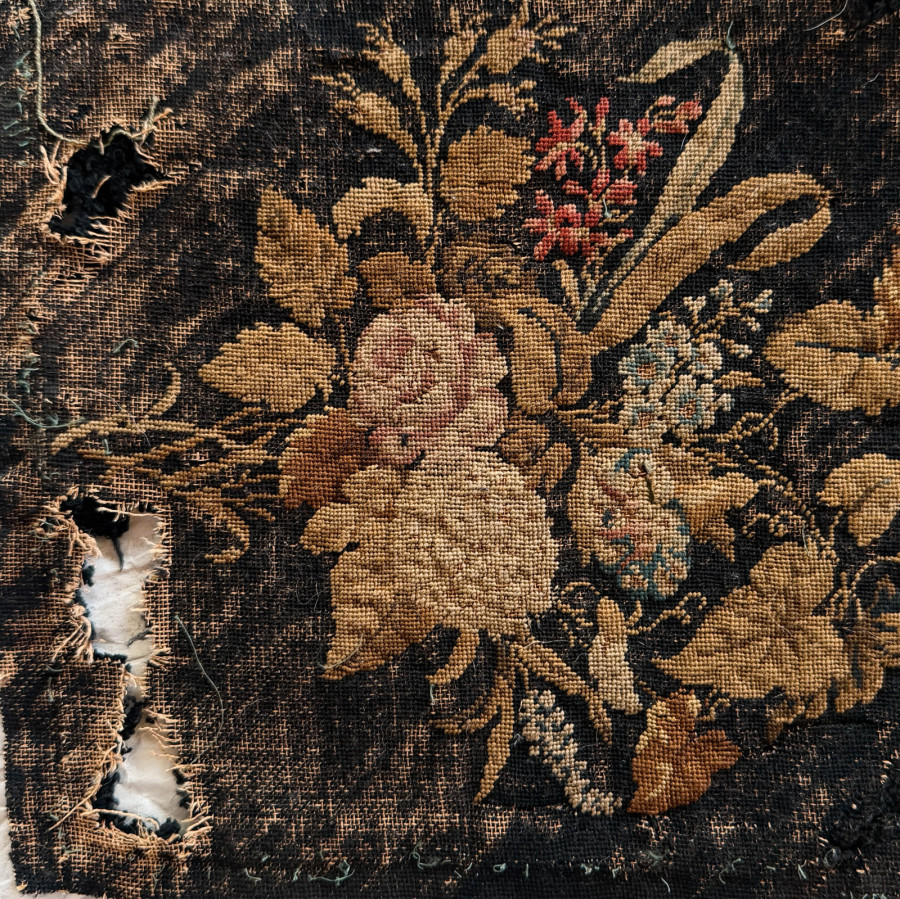
I bought this needlepoint on Vinted for £8. It arrived as a cushion, stabilised on the back with iron-on vilene, which should have been a clue. Underneath, the black background was falling apart. Not fading, not worn. Actively crumbling, the wool fibres breaking down into something that looks more like ash than yarn.
The cause is the dye. To achieve that deep Victorian black, dyers used heavy tannin and iron, often without sufficient rinsing. Over 150 years, the acid produced by that combination has destroyed the wool and started eating through the canvas beneath it. In the film below I look at what happened, what it tells us about using iron in our own natural dyeing practice, and what on earth you do with a piece like this once you understand what’s going on.
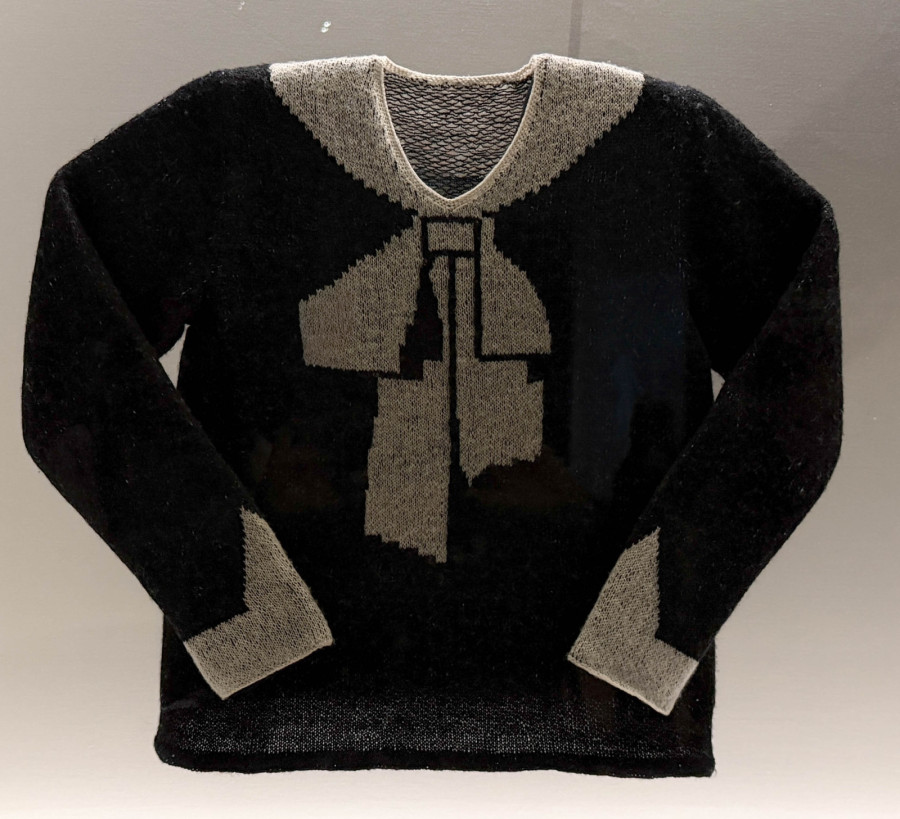
Elsa Schiaparelli’s knitwear and the women who made it possible
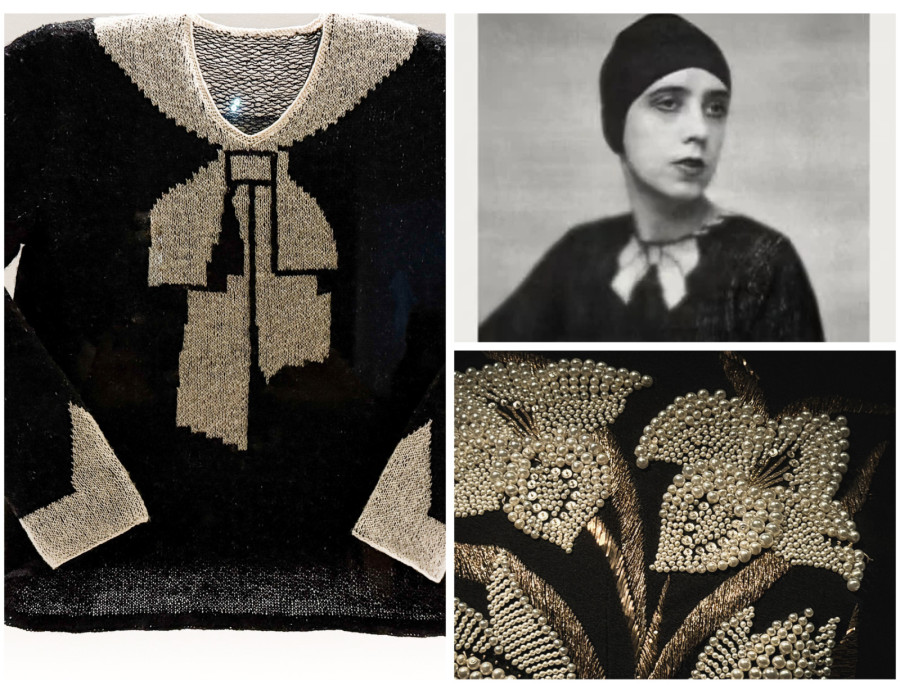
I went to the Schiaparelli retrospective at the V&A last weekend and came home thinking not about the couture, but about the 1920s knitwear at the beginning of the show, and about how businesses actually start.
The official origin story, as with most origin stories, turns out to be simpler than the truth. When I started following the trail of who was actually involved in getting Schiaparelli’s business off the ground, I kept finding women who’d been described in a single word. Socialite. Buyer. Friend. Women who, when you look properly, turn out to have been doing something quite specific and quite important.
The biographer Anna Funder writes that whenever she comes across someone described that flatly in a historical source, she follows it, because nine times out of ten it leads to a woman who made something happen but didn’t get the credit for it. That’s exactly what I found here.
In this film I look at the years 1920 to 1929, the knitwear that launched the business, the Armenian refugee whose technique made the bow jumper possible, and the women around Schiaparelli who provided money, contacts, shelter and opportunity at the moments when she needed them most.
